with "viewer presents awareness" and geeky frame.
 Yup, yet another digital picture frame made from an old laptop. Added value: "viewer awareness intelligence". Say what? Ohh, nothing big. Simply a PIR (passive infrared sensor) to detect motion and turn on/off the back-light lamp. This prevents the lamp from burning out too quickly. To make things more interesting, a frame made out from discarded industrial printed circuit board. Perfect for the geek's house, ain't it?
Why ?
 I have few of these long-obsolete, unwanted laptops in my garage and a desire to do something with them. They work...sort of. You can run Win95 on one, a Win3.1 on another and DOS on the oldest one. OK, some of them are too old. I have picked a ca.1997 Omnibook 800CT (Pentium MMX 166MHz/80MB RAM 800x600 10" TFT LCD).
 Now what?
Obviously this has been done for years. Short recipe here:
- Get a CF card (>=128MB) and a laptop IDE-to-CF adapter (eBay)
- Using your USB card reader and your Linux Desktop (you have one, right?) install GRUB into it and a (preferably small) Linux distro.
- Install a picture viewer of choice and make it run at start.
- Copy pictures to a subdirectory.
- Remove the screen hinges and the skirts (front plates) from the laptop, then build a frame around it.
- Plug the CF & adapter in your laptop, reboot.
- Enjoy.
Add salt to taste.
Here are hints
 |
| CF card & adapter in IDE connector |
- Use GRUB pre-2 version (I used 1.98). Newer may not work with old machines. There is plenty of help on-line.
- I used TinyCore, a 10MB distro. On Omnibook 8xx series the Xvesa does not work so I had to install Xfbdev.
- For picture viewer I used FEH, avaliable for TinyCore as add on package. The only downside of FEH is lack of transitions, but with weak CPU this may be actually be a benefit.
- Add a script to start FEH after X started. The script that starts FEH goes into /home/tc/X.d/show.sh. It contains:
- feh -rzFD60 --hide-pointer /mnt/hda1/Pictures &
- as you see the pictures are in /mnt/hda1/Pictures (ie in the directory /Pictures in the top of the drive
- the rest of options tell feh to do randomized slide show changing picture every 60s
 |
| Frame w/o laptop |
The frame is make of two identical PCBs one with elements the other blank. I have taken them from a pile of garbage. By size they are big. Old PC motherboards may be of use here. A dremel and angle grinder with cutting blade are your friends. All is held together by 6 stand-offs. The laptop slides in and is screwed into the front PCB.
PIR sensor aka "viewer presents awareness"
This was the most fun. It really had few parts: reading the PIR sensor, controlling the backlight, implementing the script to bind them all.
To Port or not to Port
 |
| Laptop with PIR and PP connected The CPU part is tackled under. |
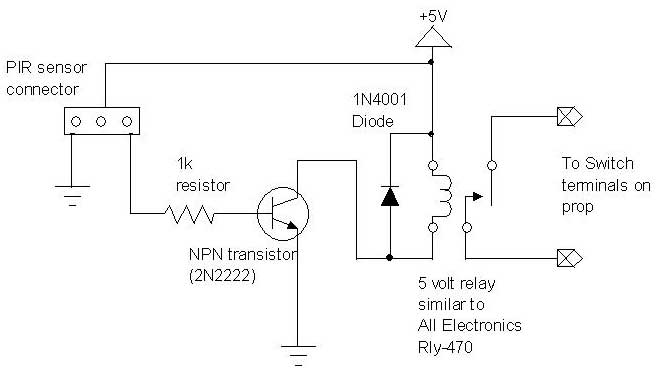
However, my laptop (like many other) has and open-collector outputs that are internally pulled-up by 1kOhm resistors. Way too much for the Parallax PIR sensor I was planning to use (it ends up about 4mA drain). so I had to add a transistor "amplifier". Here is a good spill about the sensor and how to connect some load to its "Out" pin. The transistor output (collector) got connected to pint #15 of the port (which leads to bit #4 in STAT register).
Let there be...darkness
 |
| Modified inverter and PIR output amplifier. All powered from +5V available on the inverter. |
Scribbling the scripts
I choose to implement the monitoring of the PIR in shell scrpt. There are 3 scripts: rdport, wrport and monitor. All placed in ~/.local/bin and invoked from .profile. Granted, I could simply hooked up the PIR to a timer such as NE555 and control the backlight directly. But writing script was more fun. As benefit, the scripts can log activity in my house (do not know why I'd need it though).
Again, few obstacles to be solved:
- how to read/write a port
- access through '/dev/port'
- must be root hence 'sudo'
- use dd with seek/skip sudo dd bs=1 count=1 of=/dev/port seek=$1
- convert a string '123' to actual byte : echo -n $2 | awk '{printf("%c",$0)}'
- convert byte to a sting: hexdump -e '/1 "%u"'
- how to interpret and generate binary values
- motion=`dc $pir 8 xor 8 and p`
The script to read any ISA port 'rdport [addr]
sudo dd bs=1 count=1 if=/dev/port skip=889 2>/dev/null | hexdump -e '/1 "%u"'
The script to write any ISA port 'wrport [addr] [val]
echo -n $2 | awk '{printf("%c",$0)}' | sudo dd bs=1 count=1 of=/dev/port seek=$1 2>/dev/null
There is a small problem with this script as I cannot write 0. I think the busybox implementatino of awk's prints has problems printing 0 as this is a string terminator in C.
A script to monitor the PIR state and control the CCFL inverter "shutdown". This is the "brain". The addresses of PP CONTROL and STATUS registers are 889 and 890. The script only updates the 'shutdown' signal when its state actually changes.
The jest:
- loop forever
- check the sensor state
- if motion detected update "last motion" time stamp
- if "last motion" time stamp tool old (here 300 seconds) then turn off the backlight
- otherwise turn on the backlight
# monitor PIR sensor and control backlight
# handy function for time-stamping
now() {
echo -n `date +%s`
}
# initialize start conditions
maxElapsed=300 # 300 SECONDS = 5 MIN
off=1
lastMotion=$(now)
# loop forever
while true; do
# read and check PIR (bit #3 of ParPort hence mask is 2^3=8)
pir=`rdport 889`
motion=`dc $pir 8 xor 8 and p`
if [ $motion -ne 0 ]; then
lastMotion=$(now)
fi
# see if enough time elapsed since last registered motion
elapsed=$(expr $(now) - $lastMotion)
if [ $elapsed -gt $maxElapsed ]; then
requestOff=1
else
requestOff=0
fi
#echo $pir $motion $lastMotion $elapsed $expired $off
# if changes the state of backlight then apply it
if [ $requestOff -ne $off ]; then
off=$requestOff
if [ $off == 1 ]; then
echo -n 'OFF: ';date;
wrport 890 2
else
echo -n 'ON : ';date;
wrport 890 1
fi
fi
done
Todo
I'd like to have Forward/Backward buttons.
Have it WiFied to my picture archive (get a better laptop for this).
Make it serve beer.
Go on line and download some ...wait!THE END


